

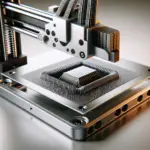
Glass Surface for Optimal 3D Printing Adhesion
Welcome to a fascinating exploration into the world of 3D printing, where achieving the perfect print relies heavily on your choice of hotbed surface. In “Glass Surface for Optimal 3D Printing Adhesion,” you’ll delve into the marvels of using a glass hotbed to secure your prints effortlessly. The smooth and even texture of a glass surface provides unparalleled adhesion, ensuring that your intricate designs stay firmly in place during the printing process. By the end of this guide, you’ll understand why a glass hotbed might just be the key to elevating your 3D printing projects to new heights. Have you ever wondered which 3D printing hotbed surface provides the best adhesion? It’s a question that many 3D printing enthusiasts and professionals frequently ask. If you’re deeply involved with 3D printing, you probably already understand the importance of having a reliable surface under your print. The quest for achieving the perfect print often starts with ensuring that your print adheres well to the printer bed. Among various options, a glass hotbed often comes up as a favorable choice.


Understanding 3D Printing Adhesion
Adhesion is the phenomenon of material sticking to a surface. In 3D printing, achieving optimal adhesion between the first layer of your print and the print bed is crucial to the success of your project. Poor adhesion causes several issues such as warping, print displacement, and even total print failures.
Factors Affecting Adhesion
The effectiveness of adhesion depends on several factors including bed surface material, bed temperature, print material, and even the first layer settings in your slicer software. Understanding how these factors interplay is vital for making an informed choice.
Why Glass?
Glass hotbeds are particularly popular due to their unique properties. Let’s delve into why glass is often recommended:
- Smooth and Flat Surface: Glass provides an incredibly smooth and consistent surface that helps in the even distribution of the first layer of filament.
- Thermal Stability: Glass maintains temperature well, aiding better thermal management during the printing process.
- Versatile Compatibility: Glass beds are compatible with a wide variety of filaments including PLA, ABS, PETG, and more.
- Ease of Cleaning: Cleaning a glass bed is relatively easy compared to other materials. A clean surface is paramount for good adhesion.
Types of Glass Surfaces
When it comes to glass surfaces for 3D printing, you generally have a few options:
- Plain Glass: Simple and cost-effective, but it may require adhesion aids like glue sticks or hairspray.
- Borosilicate Glass: More resistant to thermal shock, making it ideal for high-temperature prints.
- Tempered Glass: Offers durability and safety but is usually more expensive.
Prepping Your Glass Hotbed
Before you start printing, it’s crucial to prep your glass hotbed properly. Here’s a step-by-step guide:
- Cleanliness is Key: Use isopropyl alcohol to thoroughly clean the glass, removing any grease, dust, or leftover filament.
- Adhesion Aids: Apply a thin layer of an adhesion aid such as a glue stick, hairspray, or a specialized 3D printing adhesive if needed.
- Leveling the Bed: Ensure your bed is perfectly level to distribute filament uniformly in the first layer.
- Temperature Settings: Set your bed temperature according to the filament manufacturer’s recommendations.
Adhesion Comparison: Glass vs. Other Surfaces
To provide a clearer understanding, let’s examine how glass compares with other common 3D printing surfaces:
| Surface Type | Pros | Cons |
|---|---|---|
| Glass | Smooth, flat, easy to clean, good thermal stability | May require adhesion aids, can be fragile |
| PEI (Polyetherimide) | Excellent adhesion, easy to clean | Expensive, can be sensitive to certain filaments |
| BuildTak | Good adhesion, easy to replace | Can wear out over time, more expensive |
| Kapton Tape | Good for high-temperature filaments | Tricky to apply, needs frequent replacement |
| Blue Painter’s Tape | Inexpensive, easy to apply | Limited lifespan, lower adhesion quality |

Adjusting First Layer Settings
Optimizing your first layer settings is essential to maximizing adhesion on a glass surface. Here’s what you might adjust:
- Layer Height: A thinner first layer increases adhesion.
- Printing Speed: Slower speeds allow the material to settle better.
- First Layer Temperature: A slightly higher temperature can improve adhesion.
Troubleshooting Common Adhesion Issues
Even with the best-prepped glass hotbed, you might still encounter adhesion issues. Here are common problems and their solutions:
Warping
Warping occurs when the edges of your print start lifting from the bed. This can spoil your print and waste material.
Solution:
- Increase bed temperature.
- Use a brim or raft in your slicer settings.
- Ensure good bed leveling.
First Layer Not Sticking
If your first layer isn’t adhering, it might be due to inaccurate bed leveling or insufficient adhesion aids.
Solution:
- Re-level your bed.
- Clean the glass surface thoroughly.
- Apply an adhesion aid.
Print Displacement
Print displacement can ruin the entire print and usually occurs due to sudden bumps or changes in adhesion during the print.
Solution:
- Check for firmware updates for more stable printing.
- Use Z-hop features in your slicer software to avoid head collisions.
- Regularly check the adhesion quality post every print to ensure it maintains consistency.

Maintaining Your Glass Hotbed
To keep your glass hotbed in optimal condition, follow these maintenance tips:
- Regular Cleaning: Clean the glass surface after every print.
- Avoid Scratches: Avoid using hard tools to remove prints as they can scratch the glass.
- Handling with Care: Although sturdy, glass can crack with sudden temperature changes or mechanical force.
Special Materials and Glass Beds
Certain materials pose unique challenges when printing on glass. Here’s a quick guide on how to handle them:
Printing with PLA
PLA is one of the most commonly used filaments and works well with glass beds. Preheat the bed to around 60°C and apply a light coat of adhesive aid.
Printing with ABS
ABS can be more challenging due to its tendency to warp. A higher bed temperature of around 100°C is recommended, and using a brim can help with adhesion. Employing an enclosure can also minimize warping.
Printing with PETG
PETG typically adheres well to glass, but sometimes it can adhere too well, causing difficulty in removing the print. A temperature around 75°C is ideal, and using a thin layer of an adhesion aid can prevent the print from sticking too tightly.

The Economics of Using Glass
Glass surfaces are often more economical in the long run. Although the initial cost may be higher compared to traditional adhesive surfaces, their durability and reusability often offset these costs.
| Cost Aspect | Glass | Other Surfaces |
|---|---|---|
| Initial Price | Moderate | Varies from low to high |
| Durability | High | Low to moderate |
| Maintenance | Easy, minimal cost | Can be high depending on the material |
| Replacement Rate | Low | Often higher |
Real-World Examples and User Reviews
Many users swear by glass for its reliability and ease of use. Here’s what some seasoned 3D printing enthusiasts have to say:
- User A: “Switching to a glass bed improved my print quality drastically. I rarely face adhesion issues now, and cleanup is a breeze.”
- User B: “While it took some time to get used to the required preparations, my prints have been sticking flawlessly once I got the hang of it.”
- User C: “I use borosilicate glass and have had no problems even with high-temperature materials like ABS. It’s worth the investment.”
Conclusion
Choosing a glass hotbed for your 3D printer can solve many of the common adhesion issues faced by 3D printing enthusiasts. From its smooth, flat surface to its thermal stability and easy maintenance, glass offers several advantages that make the printing process more efficient and less troublesome. With the right preparation and adjustments, a glass hotbed can become an indispensable tool in your 3D printing arsenal.
So, if you’re struggling with adhesion woes or looking to elevate your printing experience, give a glass hotbed a try. Your prints—and your peace of mind—will thank you!
Happy printing!
Please disable Adblock to continue reading
Please disable Adblock to continue reading
Be the first to leave a comment